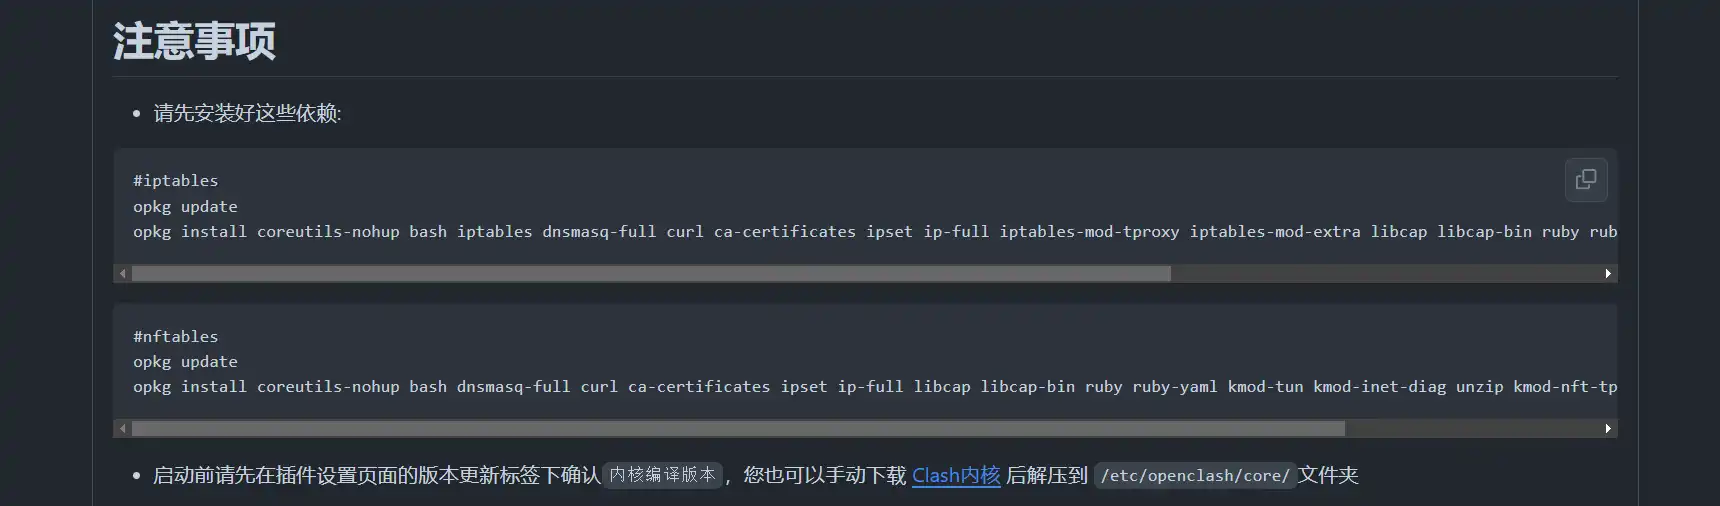
funTest(){ #----------------------------------- test -------------------------------------------------- # 开放端口(选择 test 用) if [ -f firewall_port ]; then cat firewall_port >> /etc/config/firewall uci commit firewall rm firewall_port else echo "test/区域未执行: firewall_port" fi
case $eth_nub in "1") #单网口,wan(eth0) 口测试 uci set network.wan=interface uci set network.wan.proto='static' uci set network.wan.device='eth0' uci set network.wan.ipaddr='10.0.0.240' uci set network.wan.netmask='255.255.255.0' uci set network.wan.gateway='10.0.0.1' uci set network.wan.dns='10.0.0.1'
uci add firewall zone uci set firewall.@zone[-1]=zone uci set firewall.@zone[-1].name='wan' uci set firewall.@zone[-1].input='REJECT' uci set firewall.@zone[-1].output='ACCEPT' uci set firewall.@zone[-1].forward='REJECT' uci set firewall.@zone[-1].masq='1' uci set firewall.@zone[-1].mtu_fix='1' uci commit firewall #/etc/init.d/network reload ;; "2") #双网口,wan(eth1) 口测试 uci set network.lan.proto='static' uci set network.lan.ipaddr="10.0.1.0" uci set network.lan.netmask="255.255.255.0"
uci set network.wan.proto='static' #uci set network.wan.device='eth1' uci set network.wan.ipaddr='10.0.0.240' uci set network.wan.netmask='255.255.255.0' uci set network.wan.gateway='10.0.0.1' uci commit network ###/etc/init.d/network reload
uci set ttyd.@ttyd[0]=ttyd uci set ttyd.@ttyd[0].interface='@wan' uci set ttyd.@ttyd[0].command='/bin/login -f root' uci set ttyd.@ttyd[0].debug='7' uci commit ttyd ;; *) echo "区域未执行:eth_nub" ;; esac
}
funUsed(){ # LAN 静态协议 # More options: https://openwrt.org/docs/guide-user/base-system/basic-networking if [ -n "$lan_ip_address" ]; then uci set network.lan.proto='static' uci set network.lan.ipaddr="$lan_ip_address" uci set network.lan.netmask="$lan_netmask" uci commit network else echo "区域未执行: lan_ip_address" fi # LAN 其它协议 # More options: https://openwrt.org/docs/guide-user/base-system/basic-networking if [ -n "$lan_proto" ]; then uci set network.lan.proto="$lan_proto" uci commit network else echo "区域未执行: lan_proto" fi # Wan pppoe 协议 # More options: https://openwrt.org/docs/guide-user/network/wan/wan_interface_protocols#protocol_pppoe_ppp_over_ethernet if [ -n "$pppoe_username" -a "$pppoe_password" ]; then uci set network.wan.proto=pppoe uci set network.wan.username="$pppoe_username" uci set network.wan.password="$pppoe_password" uci delete network.wan6 uci commit network else echo "区域未执行: pppoe_username" fi # WAN 其它协议 if [ -n "$wan_proto" ]; then uci set network.wan.proto="$wan_proto" uci commit network else echo "区域未执行: wan_proto" fi }
funAll(){ # 主机名 if [ -n "$host_name" ]; then uci set system.@system[0].hostname="$host_name" uci commit system uci set luci.languages.zh_cn='简体中文 (Chinese Simplified)' uci set luci.main.lang='zh_cn' uci commit luci else echo "区域未执行: host_name" fi # 时区 if [ -n "$zone_name" ]; then uci set system.@system[0].zonename="$zone_name" uci set system.@system[0].timezone='UTC-8' uci commit system /etc/init.d/system reload else echo "区域未执行: zone_name" fi # root密码 if [ -n "$root_password" ]; then (echo "$root_password"; sleep 1; echo "$root_password") | passwd > /dev/null else echo "区域未执行: root_password" fi ## WLAN ## More options: https://openwrt.org/docs/guide-user/network/wifi/basic#wi-fi_interfaces #if [ -n "$wlan_name" -a -n "$wlan_password" -a ${#wlan_password} -ge 8 ]; then # uci set wireless.@wifi-device[0].disabled='0' # uci set wireless.@wifi-iface[0].disabled='0' # uci set wireless.@wifi-iface[0].encryption='psk2' # uci set wireless.@wifi-iface[0].ssid="$wlan_name" # uci set wireless.@wifi-iface[0].key="$wlan_password" # uci commit wireless # elseecho"区域未执行: wlan_name" #fi # 终端自动登录 if [ -n "$ttyd_login" ]; then uci set ttyd.@ttyd[0].command="$ttyd_login" uci delete ttyd.@ttyd[0].interface uci commit ttyd else echo "区域未执行: ttyd_login" fi # ddns if [ -n "$ddns_host" ]; then cat d_dns >> /etc/config/ddns uci commit ddns rm d_dns else echo "区域未执行: ddns_host" fi # 端口转发 if [ -f firewall_port_Forwards ]; then cat firewall_port_Forwards >> /etc/config/firewall rm firewall_port_Forwards uci commit firewall else echo "区域未执行: firewall_port_Forwards" fi
if [ -n "$clash_rules" ]; then #openclash #uci set openclash.config.enable='1' #uci set openclash.config.dashboard_password='OpenClash8517' ###uci set openclash.@authentication[0].password='OpenClash8517' #uci commit openclash #/etc/init.d/openclash reload uci add openclash config_subscribe uci set openclash.@config_subscribe[-1]=config_subscribe uci set openclash.@config_subscribe[-1].enabled='1' uci set openclash.@config_subscribe[-1].name='clash-rules' uci set openclash.@config_subscribe[-1].address="$clash_rules" uci set openclash.@config_subscribe[-1].sub_ua='Clash' uci set openclash.@config_subscribe[-1].sub_convert='0' uci commit openclash /etc/init.d/openclash reload else echo "区域未执行: clash_rules" fi # 文件共享 磁盘管理 # 格式化format #uuid=$(blkid -s UUID -o value $dev_device) #dev_device=$(blkid -U $uuid) #mnt_device=$(echo $(blkid -U $uuid) | sed 's/dev/mnt/') disk_name=$(lsblk -Sno NAME;lsblk -Nno NAME) partn=$(lsblk -no PARTN | grep -v "1\|2\|128\|^$" | awk '{sub(/^ */, "");sub(/ *$/, "")}1') if [ "$partn" != '99' -a -n "$partn" ]; then disk_nub=$partn echo "分区序号不是 99 且不为空" else echo "区域未执行: partn" fi case $disk_name in *"nvme"*) p_disk_nub="p$disk_nub" dev_device="/dev/$disk_name$p_disk_nub" mnt_device=$(echo $dev_device | sed 's/dev/mnt/') ;; "sda") dev_device="/dev/$disk_name$disk_nub" mnt_device=$(echo $dev_device | sed 's/dev/mnt/') ;; *) format_disk='no' ;; esac # dockerd/共享 根目录路径 directory_path="$mnt_disk" case $directory_path in "1") dockerd_dir="$mnt_device/opt/docker" #匹配替换整行 sed -i "/data_root/c\ option data_root \'$dockerd_dir\'" /etc/config/dockerd #sed -i 's/opt\/docker/$dockerd_dir/' /etc/config/dockerd uci commit dockerd ksmbd_dir="$mnt_device" ;; "2") dockerd_dir="/overlay/opt/docker" sed -i "/data_root/c\ option data_root \'$dockerd_dir\'" /etc/config/dockerd uci commit dockerd ksmbd_dir="/overlay" ;; "3") dockerd_dir="/opt/docker" sed -i "/data_root/c\ option data_root \'$dockerd_dir\'" /etc/config/dockerd uci commit dockerd ksmbd_dir="/opt" ;; *) ksmbd_dir='/tmp' esac # 文件共享 if [ -n "$k_smbd" ]; then uci set ksmbd.@globals[0].interface='lan wan' uci add ksmbd share uci set ksmbd.@share[-1]=share uci set ksmbd.@share[-1].name='x86_mnt' uci set ksmbd.@share[-1].path="$ksmbd_dir" uci set ksmbd.@share[-1].force_root='1' uci set ksmbd.@share[-1].read_only='no' uci set ksmbd.@share[-1].guest_ok='yes' uci set ksmbd.@share[-1].create_mask='0666' uci set ksmbd.@share[-1].dir_mask='0777' uci add ksmbd share uci set ksmbd.@share[-1]=share uci set ksmbd.@share[-1].name='x86_etc' uci set ksmbd.@share[-1].path='/etc' uci set ksmbd.@share[-1].force_root='1' uci set ksmbd.@share[-1].read_only='no' uci set ksmbd.@share[-1].guest_ok='yes' uci set ksmbd.@share[-1].create_mask='0666' uci set ksmbd.@share[-1].dir_mask='0777' uci commit ksmbd else echo "区域未执行: k_smbd" fi # 磁盘格式化/挂载 case $format_disk in "yes") #echo -e "d\n$disk_nub\nn\n$disk_nub\n\n\nw" | fdisk /dev/$disk_name echo "y" | mkfs.ext4 $dev_device ;; "no") echo 'no 格式化'
if [ -e "$dev_device" ]; then mkdir -p $mnt_device mount $dev_device $mnt_device cd $mnt_device ls | grep -v opt | awk '{system("rm -rf "$1)}' cd - umount $mnt_device rm -r $mnt_device fi ;; "new") echo -e "n\n$disk_nub\n\n\nw" | fdisk /dev/$disk_name echo "y" | mkfs.ext4 $dev_device esac
if [ -e "$dev_device" ]; then block detect > /etc/config/fstab uci show fstab > nub nub=$(cat nub | grep "$disk_name") nub=${nub#*'['} nub=${nub%']'*} case $mnt_disk in "1") uci set fstab.@mount["$nub"].enabled='1' uci commit fstab /etc/init.d/fstab reload ;; "2") uci set fstab.@mount["$nub"].target='/overlay' uci set fstab.@mount["$nub"].enabled='1' uci commit fstab /etc/init.d/fstab reload reboot ;; "3") mkdir -p /tmp/introot mkdir -p /tmp/extroot mount --bind / /tmp/introot mount "$dev_device" /tmp/extroot tar -C /tmp/introot -cvf - . | tar -C /tmp/extroot -xf - wait #umount /tmp/introot #umount /tmp/extroot
uci set fstab.@mount["$nub"].target="/" uci set fstab.@mount["$nub"].enabled='1' uci commit fstab /etc/init.d/fstab reload #reboot ;; *) echo "没有选择挂载" esac else echo "不存在 $dev_device 设备。区域未执行: 磁盘格式化/挂载" fi }
main(){ case $CHOICE in Test) funTest funAll ;; Used) funUsed funAll ;; esac }
# wan 拨号 pppoe 协议 pppoe_username="0000000000000" pppoe_password="000000000" # Wan pppoe 协议 if [ -n "$pppoe_username" -a "$pppoe_password" ]; then uci set network.wan.proto=pppoe uci set network.wan.username="$pppoe_username" uci set network.wan.password="$pppoe_password" uci commit network fi
if [ -n "$clash_rules" ]; then #openclash #uci set openclash.config.enable='1' uci set openclash.config.dashboard_password='OpenClash8517' uci set openclash.@authentication[0].password='OpenClash8517' uci commit openclash uci add openclash config_subscribe uci set openclash.@config_subscribe[-1]=config_subscribe uci set openclash.@config_subscribe[-1].enabled='1' uci set openclash.@config_subscribe[-1].name='clash-rules' uci set openclash.@config_subscribe[-1].address="$clash_rules" uci set openclash.@config_subscribe[-1].sub_ua='Clash' uci set openclash.@config_subscribe[-1].sub_convert='0' uci commit openclash /etc/init.d/openclash reload fi
# wifi 名称及密码 #wlan_name="************" #wlan_password="************" ## WLAN ## More options: https://openwrt.org/docs/guide-user/network/wifi/basic#wi-fi_interfaces #if [ -n "$wlan_name" -a -n "$wlan_password" -a ${#wlan_password} -ge 8 ]; then # uci set wireless.@wifi-device[0].disabled='0' # uci set wireless.@wifi-iface[0].disabled='0' # uci set wireless.@wifi-iface[0].encryption='psk2' # uci set wireless.@wifi-iface[0].ssid="$wlan_name" # uci set wireless.@wifi-iface[0].key="$wlan_password" # uci commit wireless #fi
主机名,时区
使用命令设置保存应用
1 2 3 4 5 6 7 8 9 10 11 12 13 14 15 16
# 主机名,时区 host_name="OpenWrt-X86" zone_name="Asia/Shanghai" # 主机名 if [ -n "$host_name" ]; then uci set system.@system[0].hostname="$host_name" uci commit system fi # 时区 if [ -n "$zone_name" ]; then uci set system.@system[0].zonename="$zone_name" uci set system.@system[0].timezone='UTC-8' uci commit system /etc/init.d/system reload fi
# lan 静态协议地址 lan_ip_address="10.0.0.1" lan_netmask="255.255.255.0" # lan 其它协议 #lan_proto="dhcp" # LAN 静态协议 # More options: https://openwrt.org/docs/guide-user/base-system/basic-networking if [ -n "$lan_ip_address" ]; then uci set network.lan.proto='static' uci set network.lan.ipaddr="$lan_ip_address" uci set network.lan.netmask="$lan_netmask" uci commit network fi # LAN 其它协议 # More options: https://openwrt.org/docs/guide-user/base-system/basic-networking if [ -n "$lan_proto" ]; then uci set network.lan.proto="$lan_proto" uci commit network fi
# wan 拨号 pppoe 协议 pppoe_username="0000000000000" pppoe_password="000000000" # wan 其它协议 # wan_proto="dhcp" # Wan pppoe 协议 # More options: https://openwrt.org/docs/guide-user/network/wan/wan_interface_protocols#protocol_pppoe_ppp_over_ethernet if [ -n "$pppoe_username" -a "$pppoe_password" ]; then uci set network.wan.proto=pppoe uci set network.wan.username="$pppoe_username" uci set network.wan.password="$pppoe_password" uci commit network fi # WAN 其它协议 if [ -n "$wan_proto" ]; then uci set network.wan.proto="$wan_proto" uci commit network fi
ttyd 终端自动登陆
注释掉取消
1 2 3 4 5 6 7 8 9
# 终端自动登录 ttyd_login="/bin/login -f root" # 终端自动登录 if [ -n "$ttyd_login" ]; then uci set ttyd.@ttyd[0].command="$ttyd_login" uci commit ttyd fi
开放端口
开放端口(选择 test 用) 修改配置文件方式,注释掉取消
1 2 3 4 5 6 7 8 9 10 11 12 13 14 15 16 17 18 19
# 开放端口(选择 test 用) echo -e " config rule option name 'ALLOW_PORT_OUT' option dest 'wan' option target 'ACCEPT'
config rule option name 'ALLOW_PORT_IN' option src 'wan' option target 'ACCEPT'" >> firewall_port # 开放端口(选择 test 用) if [ -f firewall_port ]; then cat firewall_port >> /etc/config/firewall uci commit firewall rm firewall_port fi
端口转发
端口转发 修改配置文件方式,注释掉取消
1
2
3
4
5
6
7
8
9
10
11
12
13
14
15
16
17
18
19
# 端口转发
echo -e "
config redirect
        option dest 'lan'
        option target 'DNAT'
        option name 'alist'
        option src 'wan'
        option src_dport '5678'
        option dest_ip '$lan_ip_address'
        option dest_port '5678'" >> firewall_port_Forwards


# 端口转发
if [ -f firewall_port_Forwards ]; then
  cat firewall_port_Forwards >> /etc/config/firewall
  rm firewall_port_Forwards
  uci commit firewall
fi
# 文件共享
k_smbd="1"

# 文件共享
if [ ! -n "$ksmbd_dir" ]; then
  ksmbd_dir='/mnt'
fi
if [ -n "$k_smbd" ]; then
  uci set ksmbd.@globals[0].interface='lan wan'
  uci add ksmbd share
  uci set ksmbd.@share[-1]=share
  uci set ksmbd.@share[-1].name='x86_mnt'
  uci set ksmbd.@share[-1].path="$ksmbd_dir"
  uci set ksmbd.@share[-1].force_root='1'
  uci set ksmbd.@share[-1].read_only='no'
  uci set ksmbd.@share[-1].guest_ok='yes'
  uci set ksmbd.@share[-1].create_mask='0666'
  uci set ksmbd.@share[-1].dir_mask='0777'
  uci add ksmbd share
  uci set ksmbd.@share[-1]=share
  uci set ksmbd.@share[-1].name='x86_etc'
  uci set ksmbd.@share[-1].path='/etc'
  uci set ksmbd.@share[-1].force_root='1'
  uci set ksmbd.@share[-1].read_only='no'
  uci set ksmbd.@share[-1].guest_ok='yes'
  uci set ksmbd.@share[-1].create_mask='0666'
  uci set ksmbd.@share[-1].dir_mask='0777'
  uci commit ksmbd
fi